-
 Blog
Blog
-
Tutorial: IntelliJ IDEA Plugin Development - ...

In this blog post I will show you how to start with IntelliJ IDEA plugin development. Since there is not a lot of documentation about plugin development for IntelliJ IDEA, I’ll be explaining how to create a simple plugin and execute code after a project was opened using the StartupActivity class.
I am currently developing an IntelliJ IDEA plugin for our analysis software Teamscale (similar to our Microsoft Visual Studio extension). In this post, I want to share some knowledge that I’ve learned when creating the plugin. After opening a project the plugin needs to initialize a connection to the Teamscale server. Therefore I needed to find out how to easily execute some code after a project was opened with the plugin enabled.
Preparations
Before we can start with the development, you’ll need a working IntelliJ IDEA installation. Download either IntelliJ IDEA Community or Ultimate Edition and install it.
Getting Started
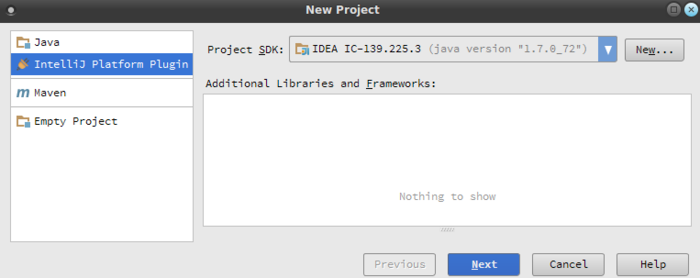
First, let’s create a new plugin project. To create one use File -> New Project… and select IntelliJ Platform Plugin. Now at the top, create a new Project SDK (if you’ve never used IntelliJ IDEA, first configure the Java JDK as prompted). As Project SDK folder, select the IntelliJ IDEA installation folder. Now continue to create the project.
After the project has been created, you should be greeted by an open plugin.xml file. It contains all necessary meta information about the plugin and is the place were actions and contributions to the UI will be registered.
Insert the plugin’s name under the <name> tag and assign it a unique ID using the <id> tag:
<id>com.teamscale.ide.intellij</id>
<name>Teamscale IDE Plugin</name>
<version>1.0</version>
<vendor url="http://www.cqse.eu">CQSE GmbH</vendorRunning Code After Loading a Project
Now that we’ve prepared our plugin, let’s see how we can run some code after opening a project. To do that, we need to create a new class that implements StartupActivity and register it in the plugin.xml.
Creating the StartupActivtiy
First let’s create a new class implementing the StartupActivity interface:
package com.teamscale.intellij;
import com.intellij.openapi.project.Project;
import com.intellij.openapi.startup.StartupActivity;

/**
 * This is our sample StartupActivity used to execute code on project open.
 */
public class SampleStartupActivity implements StartupActivity {

    @Override
    public void runActivity(Project project) {
        // This code is executed after the project was opened.
        System.out.println("Hello World! Loaded project: " + project.getName());
    }
}
Classes implementing the StartupActivity interface can be registered with IntelliJ IDEA to run the code in the runActivity(Project project) method.
Registering the StartupActivity
To register the SampleStartupActivity in the plugin.xml under the <extensions> tag, add the following to the <extensions>
<extensions defaultExtensions="com.intellij">
    <postStartupActivity implementation="com.teamscale.intellij.SampleStartupActivity"></postStartupActivity>
</extensionsRunning the Plugin
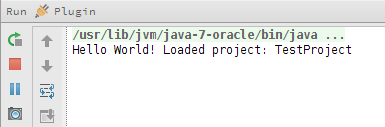
Now it’s time to run the plugin and see if the SampleStartupActivity works as it is supposed to. To start the plugin, press the start button at the top right of IntelliJ IDEA:
![]()
Now a second IntelliJ IDEA instance should start. If you switch back to the main instance after the project in the new instance has finished opening and take a look at the console you should see the text printed to the console:
That’s it for this tutorial. I hope I could help you getting started with IntelliJ IDEA plugin development.
In case your interested: Our Teamscale Intellij plugin is published on the official Intellij plugin site.